eTimesheets
Welcome to eTimesheets. This topic will step you through the process of entering your timesheet electronically. It is divided into two sections: Time Entry and Supervisor Approval.
Time Entry
Begin by opening your internet browser and navigating to the website provided by your employer. A screen similar to the following will appear.
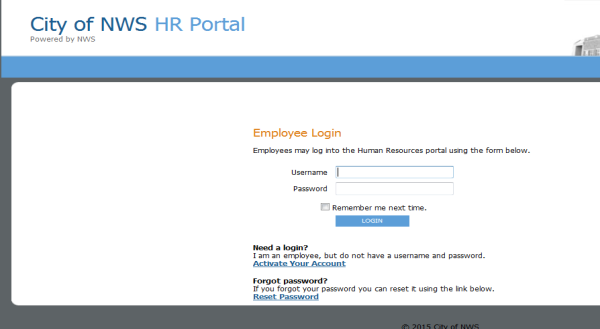
If you have been provided with a Username and Password, please enter and click LOGIN.
If you have been instructed to create your own Username and Password, click on Active Your Account. You will be required to provide your last name and Social Security Number and then asked to create a unique Username and Password.
Your Username must be at least seven characters long. Your Password must be between five and twenty-five characters long.
Note: It is imperative that you do not share this information with anyone, including coworkers, supervisors or spouses.
Once you have created you Username and Password, you will then enter them on the screen shown above to access your account. After clicking LOGIN, a screen similar to the following will appear.
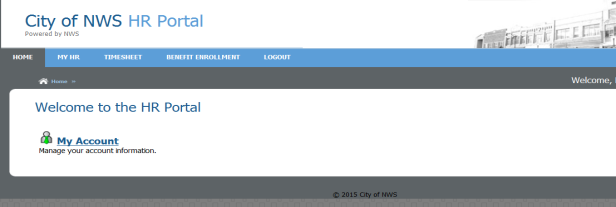
To begin entering time to your electronic timecard, using your mouse, hover over the word TIMESHEET on the blue bar and then click on the words Time Entry. A screen similar to the following will appear.
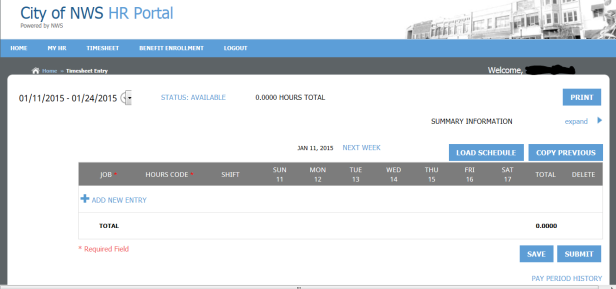
The time period for time entry defaults to the one that includes today’s date. To change the time period, use the down arrow next to the date range to select the time period for which you wish to enter time.
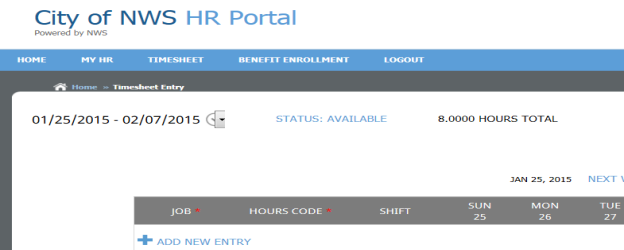
At this point, no time has been entered and no values appear in the time entry screen. The appropriate date for the first week of time entry will appear below each of the days of the week.
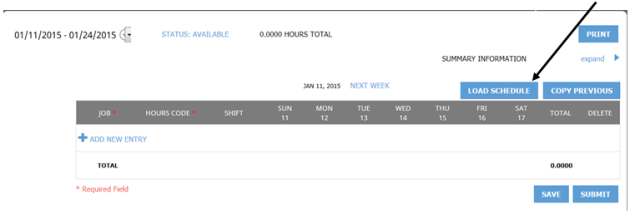
Next you will click on Load Schedule in Blue, unless, for this pay period, you did not work any regularly scheduled hours. Once you click, you will receive a warning: “Are you sure you want to load entries? All existing entries will be overwritten.” Click Continue.
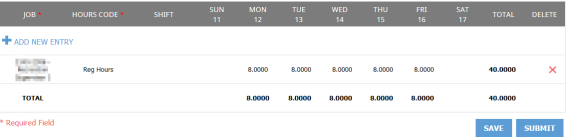
Your regularly scheduled work hours have now been loaded into the time entry screen and will look similar to the screen below. Time entry is completed in weekly increments, so you will view and edit time per week. Changes made to weekly time should be saved, but the submit button should not be used until all days in the period are completed.
Another option for loading hours is the Copy Previous button. The entries from the previous payroll time period for hours codes, jobs, shift codes, general ledger and projects will be loaded but without a quantity of hours. After clicking on this button, a message will appear, “Are you sure you want to load entries? All existing entries will be overwritten.” Click Continue.
The scheduled hours that were loaded, either from the schedule or the previous pay period, may need to be modified or added to for a number of reasons:
- Different Job
- Different Hours Code (Vacation, Sick, Holiday, etc.)
- Different Shift
- Different or New Project
- Different G/L
To begin making changes, click on +Add New Entry. A screen similar to the following will appear.
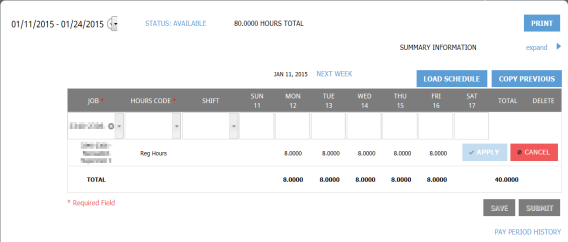
Your primary, or main, job defaults in the first section. To change the job, use the drop-down arrow to the right of the box to choose the job for which you wish to add hours.
Next, click in the box below the words Hours Code. This is a mandatory field. You will receive an error message if you try to save without populating this field. Use the drop-down arrow to the right of the box to choose the hours code for which you are adding hours. For example if you took a four hours of vacation time on Tuesday, select the Vacation hours code. Another example, if you also worked Overtime on Wednesday, you will need to add another entry in order to choose the overtime hours code.
The next column, Shift, will be completed by using the drop-down if your organization uses Shift Codes and you worked a shift other than what was loaded from your schedule. In this example, select Regular as the hours code and the appropriate Shift code from the drop-down for eight hours worked on Friday on 2nd shift.
The number of hours worked will now be entered by clicking in the box below the appropriate day. Using the numbers on your keyboard, type in the correct quantity of hours.
After adding necessary entries, click Apply on the right side of the screen below the entries you just added.
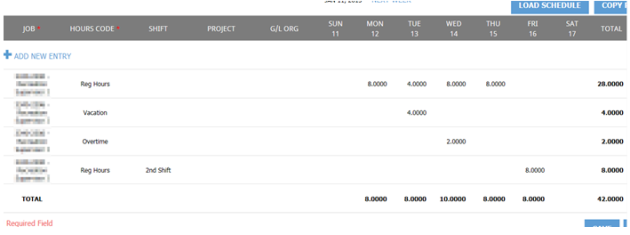
The examples, four hours of vacation on Tuesday, overtime on Wednesday and eight hours worked Friday on 2nd shift would look similar to the following screen after entry.
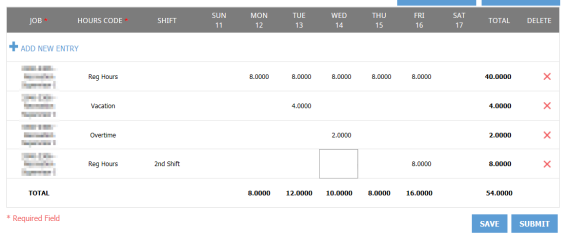
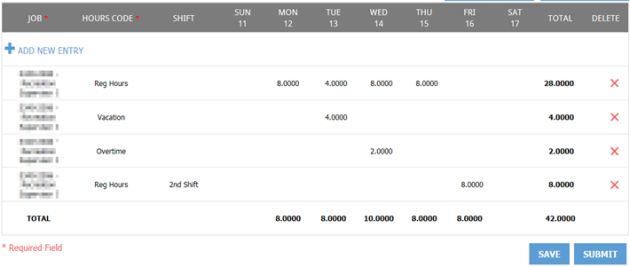
Notice that the totals for Tuesday and Friday are now incorrect. The time that was loaded from your schedule needs to be adjusted. Click on the number of hours that need to be changed or deleted. Once you have made the appropriate changes, your screen will look similar to the following.
During time entry, if you attempt to use an hours code for time off that does not have a sufficient balance, after clicking Save, a pop-up will appear with the following message: “Your timesheet has errors. Please review.” Click on OK and scroll to the top of the page to view the errors. In the example below, the employee attempted to use four hours of Wellness time.
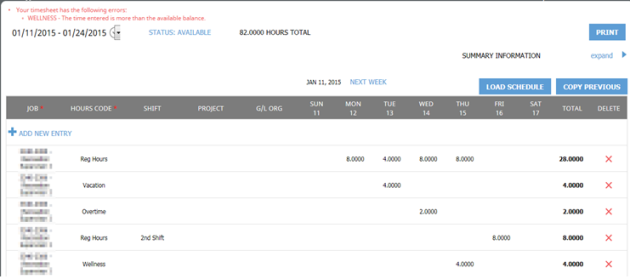
All errors must be corrected before your timesheet can be saved and submitted. To assist you, a summary view of your employee information, time entered and accrual balances are available. Click the word “expand” next to Summary Information to review the number of hours that are available for use during this pay period. In the example below, the employee only has two hours of Wellness time. The error message was received because four hours of Wellness was entered.
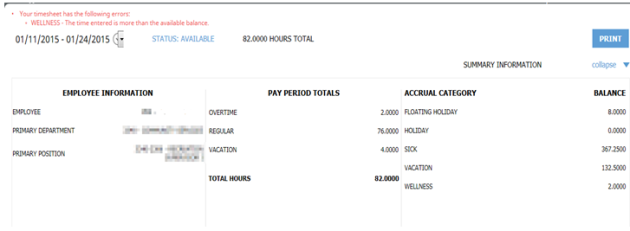
Once you are finished reviewing the summary information, click on “collapse” to view just the timesheet.
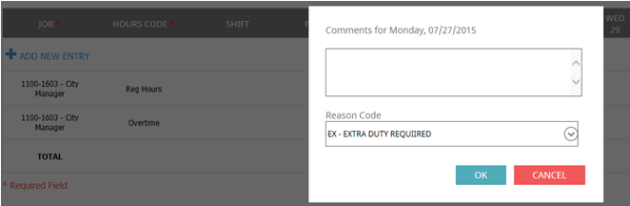
An additional time entry option is the ability to add comments with reason codes. For example, your employer may require that you explain why overtime was worked. After clicking on the entry for two hours of overtime on Wednesday, type the letter “C” on your keyboard. A pop-up screen will appear for you to enter comments and, if authorized, a reason code.
Click OK after typing your comments.
Once you are satisfied that the entries are correct, click Save in the bottom right corner. This only saves your entries for this week and does not send your timesheet to your supervisor for approval. You will not click Submit until both weeks of time have been entered.
Two additional columns may be available to you, Project and G/L Org. These columns will appear on your timesheet as shown below if your employer requires you to submit time against a project or if you need to change the G/L to which your time will be expensed.
To add time against a Project or G/L Org, click +ADD NEW ENTRY. Add the appropriate hours code using the drop-down menu. Click on the field below Project or G/L Org. Use the drop-down to the right to select the correct entry. Click Apply. Click Save when you are satisfied that the entries are correct.
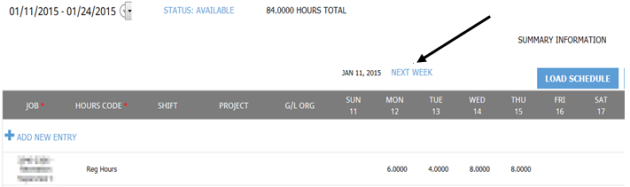
To begin time entry for the second week of the pay period, click Next Week above the time sheet.
Your regularly scheduled hours will be populated for the second week as well as a copy of the first weeks’ time entries with the quantity of hours left blank. These blank lines can be populated with number of hours worked as appropriate or left empty. You may also add additional lines of time for codes that were not used in the first week. After completing the second week of time, click Save.
After completing your timesheet for the entire pay period and saving your entries, click Submit in the bottom right corner. A pop-up will appear asking you to confirm that your entries are correct. Click Agree to send your timesheet on for approval or Disagree to make corrections. Once you agree your time entries are no longer available to make changes. However, if you realize that you have made an error, you can use the Recall button to remove your submission. This must be done prior to supervisor approval.
To print a copy of the Timesheet Report, click the PRINT button in the top right hand corner under your name. A pop-up report will appear for you to send to a printer.
When you are finished completing time entry, click on LOGOUT at the top of the page.
Supervisor Approval
To add your approval to employee’s time entry, using your mouse, hover over the word TIMESHEET on the blue bar and then click on the words Time Approval. A screen similar to the following will appear.
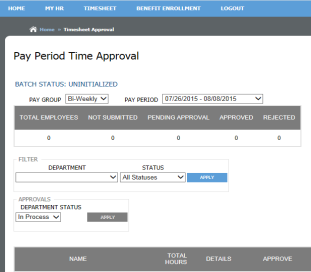
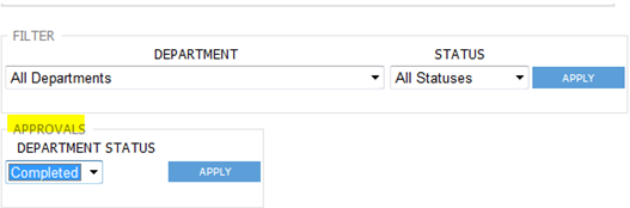
The pay period that includes today’s date will default in the PAY PERIOD drop down. Click on the arrow next to the drop-down to select the pay period for which you are adding approvals. Then choose the department for which you are approving by using the arrow under DEPARTMENT and clicking on the appropriate department. Click APPLY in Blue. The page will refresh and you will then scroll down the page to see a screen similar to the following.
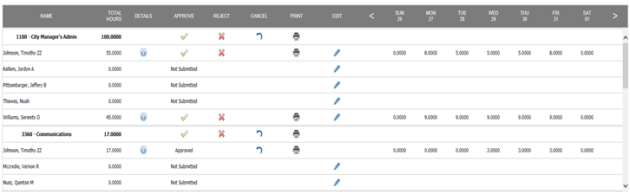
If you are authorized to edit an employee’s timesheet, click the pencil icon in the employee’s row. To review an employee’s time entry on the screen, click on the details symbol in the Details column. This symbol only appears in the column after an employee has entered and submitted time for approval. After clicking on the symbol, a screen similar to the following will appear that details the time entry for the employee for the selected pay period.
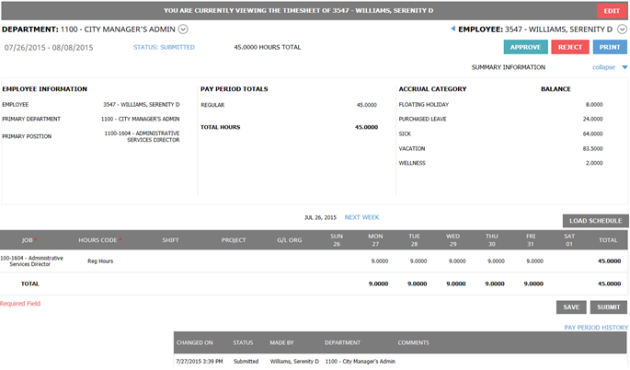
If you are reviewing the timesheet and are authorized to edit it, you may click the red Edit button in the top-right border of the display. The timesheet will be enabled for editing.
To review employee information, pay period totals and accrual balances, click the word expand near the top-right of the display (below the Print button).
If a blue line appears under a time entry, the employee has entered a comment regarding the hours. Using your mouse, hover over the entry and the comment will appear on the screen for your review.
Once the time has been reviewed and you are ready to approve or reject the time entry, you will close the window using the red X in the top right hand corner. You also have the option of printing the Employee Timesheet Report from this screen prior to closing the window. Click the PRINT button at the top of the page and the report will generate in the pop up window. From here you can send the report to your printer.
Another option for printing the Employee Timesheet Report is to use the print icon in the Print column. You can choose to print the report for all employees in the department by clicking on the icon in the row for the Department or you can choose to print just an individual’s report by clicking on the icon in the row with the employee’s name.
Once time has been reviewed, you will now either reject or approve the time entered. If an employee has made an error in their time entry that you wish them to fix, click the red X in the row next to their name in the REJECT column. A pop up similar to the following will appear.
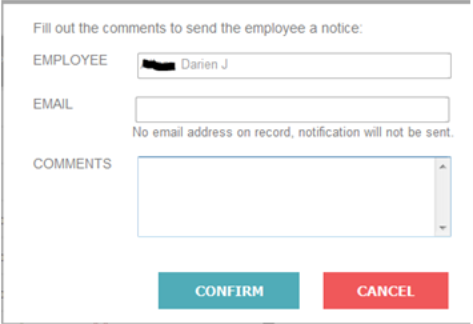
If the employee’s email has been set up, not only will the time be rejected, but a notification of the rejection will be sent to the email on file. If the email has not been set up, the time will just be rejected and any comments completed by you will only appear on the employee’s time entry screen in eTimesheets. The COMMENTS section is not required, but is recommended so that the employee knows why the time was rejected and corrections can be made. Click CONFIRM to reject the time.
If you wish to Approve an employee’s time, click on the word APPROVE at the bottom of the detail pop up or the green checkmark in the row next to their name in the APPROVE column on the summary screen. Time is now approved and the green checkmark is replaced with the word Approved. If the approval was added in error, you can remove the approval by clicking on the curved arrow symbol in the Cancel column. Once time has been imported by your payroll department, this option is no longer available.
If all of the employees in your department(s) have submitted time and you have approved time for all of them, you are now finished with the approval process. However, if any of your employees did not enter time for the period, you must now complete your payroll. Under Approvals, change the status from In Process to Completed and click APPLY. This will signal to the payroll department that departmental time is finished even if some employees did not have time entered.